Multiple ruby on rails applications under different folders served by Apache on Mac OS X

I’ve been doing quite a bit of development recently using Ruby on Rails under Mac OS X. Unfortunately it can be a little tricky to get rails apps deployed nicely under Apache. The machine I’m using is an aging G4 with very little RAM so running rails apps in CGI mode is very slow! Initially I tried FastCGI, but I found it to be unreliable :( 
After a bit of looking about on the net I came across SCGI (
http://www.mems-exchange.org/software/scgi/ ) and some code to use it to run rails. apps ( http://www.zedshaw.com/projects/scgi_rails/ ). 
Installing these pieces is pretty straight forward 
 
1. download and install the SCGI apache module 
2. install the cmdparse gem (
sudo gem install cmdparse) 
3. install the highline gem (
sudo gem install highline) 
4. install the SCGI rails runner 
5. configure your rails apps for SCGI by executing
scgi_ctrl config in each rails app root folder 
 
Make sure that each of your rails apps has a different port selected in the config/scgi.yaml file 
 
Next we need to update
the Apache config file /etc/httpd/httpd.conf 
 
LoadModule scgi_module libexec/httpd/mod_scgi.so 
AddModule mod_scgi.c 
 
<IfModule mod_scgi.c> 
  # matches locations with a dot following at least one more characters, that is, 
  # things like *,html, *.css, *.js, which should be delivered directly from 
  # the filesystem 
  <locationmatch \..+$> 
    # don’t handle those with SCGI 
    SCGIHandler Off 
  </locationmatch>  
</IfModule> 
 
Alias /app1 “/Library/WebServer/RailsApps/app1/public” 
SCGIMount /tbgmon 127.0.0.1:9999 
<directory “/Library/WebServer/RailsApps/app1/public”> 
  Options +FollowSymLinks 
  Order allow,deny 
  allow from all 
</directory> 
 
Alias /app2 “/Library/WebServer/RailsApps/app2/public” 
SCGIMount /app2 127.0.0.1:9998 
<Directory “/Library/WebServer/RailsApps/app2/public”> 
  Options +FollowSymLinks 
  Order allow,deny 
  Allow from all 
</Directory>
 
 
Now we start each of the SCGI server processes by running the
scgi_ctrl start command in each rails app root folder, bounce apache using sudo apachectrl graceful and the rails apps should be up and running from http://localhost/app1/ and http://localhost/app2/ 
 
That is only half of the story however. We need to have the SCGI server processes start when the machine boots. The way to do this under Mac OS X is to create a startup item. A startup item consists of a couple of files in a folder under /Library/StartupItems. One is a .plist file and the other is a shell script. 
 
Create a folder called SCGI under /Library/StartupItems and then create the file StartupParameters.plist with the following content 
 
{ 
  Description = “SCGI”; 
  Provides = (“SCGI”); 
  Uses = (“Web Server”); 
}
 
 
Next create a file called SCGI and paste in this text 
 
#!/bin/sh 
 
## 
# SCGI 
## 

. /etc/rc.common 
 
StartService () 
{ 
    echo “Starting SCGI servers” 
     
    pushd /Library/WebServer/RailsApps/app1/ > /dev/null ; /usr/bin/scgi_ctrl start ; popd > /dev/null 
    pushd /Library/WebServer/RailsApps/app2/ > /dev/null ; /usr/bin/scgi_ctrl start ; popd > /dev/null 
} 
 
StopService () 
{ 
    echo “Stopping SCGI servers” 
    ps ax | grep scgi | grep ruby | awk ‘{print $1}’ | xargs kill 
} 
 
RestartService () 
{ 
    StopService 
    StartService 
} 
 
RunService “$1”
 
 
According to the SCGI rails runner docs there is an option to choose the root folder of the rails app, but I couldn’t get it to work. I suppose I should contact the author about it one of these days ;) 
 
Now with any luck the next time your machine reboots the SCGI servers should be started and Apache should forward requests on to your rails apps. 

The joys of coding with a child on your lap

Well, for one you can only do it one handed! 
Also you have to be ready for sudden lunges towards the keyboard. Bang bang bang go the keys. Oops a wrong click or an inopportune Enter and say goodbye to all that work. 
Still it is nice for the little one to see what Daddy does all day, even if I have to spend most of the time stopping her from eating any CDs and other things I’ve foolishly left just within reach 😉 
 
 
The monster child expresses her undying love for Daddy’s G5

Cocoa bindings

I have to say that Cocoa bindings are one of the coolest things to some to Cocoa in a long time. 
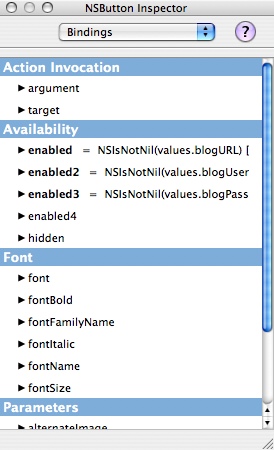
It takes a bit of getting used to however, and the documentation isn’t the greatest. One of the things that had me stumped for a bit was how to have a button
s enabled flag depend on more than one edit field having a value. There was only one Enabled binding. It seems that Interface Build adds more Enabled bindings as you create them. So you add an Enabled binding, and all of a sudden in the bindings tab appears Enabled2. Add another one and what do you know Enabled3 magically comes into existence 🙂 
I spent a little while looking to see if there was some way of doing something like Enabled = IsNotNull(field1) and IsNotNull(field2) and IsNotNull(field3), when all I had to do was just add them in. 


It’s nice when the tools are smart like this, although it would also be nice if there was some documentation that said something like this would happen. I guess I should have know it would do that since it makes sense for it to do so. One of the nice things about Apple software is that it tends to just work (most of the time). 

The cocoa rendering system is really nice

For a secret project I’m currently working on I needed to make a NSTextView that resized its contents so that it was always fully visible regardless of how many lines of text were in there. Coding something like that under Windows would have been pretty awful (especially since the text needs to still be editable), but cocoa made it a snap. Just make sure that the ratio of the control bounds and the parent controls frame is correct every time the text changes 🙂 The more I use cocoa, the more I want to use it, and the less I want to go back to other systems. 
 
From what I understand the Microsoft .Net stuff would allow a similar approach, and the Java swing libraries would definitely allow it 

Blog APIs

It can be quite annoying when an application claims to support an API and actually doesn’t 🙁 
I’ve been working on BlogThing off an on for about a week or so. Originally I used a bit of the metaWeblog API and a bit of the MovableType API. I’ve since standardized on metaWeblog and removed the references to MovableType. 🙂 
 
Now, I’ve successfully tested BlogThing against WordPress and Typo however, Blojsom, while it claims to support the metaWeblog API it soon becomes apparent that this is not the case 🙁

Accessing the string and attribute data in a NSTextView

NSTextView stores its data in a NSTextStorage object. NSTextStorage descends from NSMutableAttributed string, so that gives us a clue. 
The easiest thing to do is to make a category on the NSAttributedString class to do whatever it is you want containing something like the following. 
 
    NSRange range; 
    
int i; 
    
int L = [self length]; 
             
    i =
0; 
    
while(i<L) { 
         
// get all the attributes we are interested in 
        NSDictionary* attributes = [
self attributesAtIndex: i effectiveRange: &range]; 
        NSAttributedString* attPart = [
self attributedSubstringFromRange: range]; 
        NSString* part = [attPart string]; 
        NSFont* font = [attributes objectForKey: NSFontAttributeName]; 
        NSColor* color = [attributes objectForKey:
@”NSColor”]; 
        NSParagraphStyle* paraStyle = [attributes objectForKey: NSParagraphStyleAttributeName]; 
        NSShadow* shadow = [attributes objectForKey: NSShadowAttributeName]; 
        NSURL* link = [attributes objectForKey: NSLinkAttributeName]; 
         
        NSTextAttachment* attachment = [attributes objectForKey: NSAttachmentAttributeName]; 
         
         
// process your attributed string pieces here 
 
        i = range.location+range.length; 
    } 

Colourized entries

    I went to all the trouble of adding code to allow for different fonts and colours and such. I tested it on my local machine against WordPress 1.5x and it all worked perfectly. Then I tried to make a post here where I’m running WordPress 2.0 and found that it stripped out all the lovely colours. 
 
    After a bit of poking about on the net I found that this is a bug in the 2.0 WordPress code base and as since been fixed in the 2.0.1 release. So after a quick update of the code…. Here we are. 
 
// 
// BlogAPI.h 
// BlogThing 
// 
// Created by Daniel Parnell on 28/01/06. 
// Copyright 2006 Automagic Software. All rights reserved. 
// 
 
#import <Cocoa/Cocoa.h> 
 
 
@interface BlogAPI : NSObject
    
NSURL* url; 
    
NSString* username; 
    
NSString* password; 

 
+ (BlogAPI*)
blogAPIWithURL:(NSURL*)aURL username:(NSString*)aUsername andPassword:(NSString*)aPassword; 
+ (
NSString*) describeBlogError:(NSDictionary*)errorInfo; 
 
– (
id) initWithURL:(NSURL*)aURL username:(NSString*)aUsername andPassword:(NSString*)aPassword; 
 
– (
void) setUsername:(NSString*)aUsername; 
– (
NSString*) username
– (
void) setPassword:(NSString*)aPassword; 
– (
NSString*) password
– (
void) setURL: (NSURL*)aURL
– (
NSURL*) URL
 
– (
NSArray*) getCategoryList
 
– (
int) newPost: (NSString*)aTitle withBody: (NSString*)aBody andDateTime:(NSDate*) aDateTime shouldPublish:(BOOL)flag; 
– (
BOOL) setCategories: (NSArray*)theCategories forPost: (int)aPostId
 
– (
NSString*) upload: (NSData*)data withName: (NSString*)name
 
@end 

First Post

This is my first post to my new blog.

I’ve been working on a simple blog client for my wife to use to post pictures of our daughter Molly to a private blog. Last time I’d checked there weren’t any nice blog clients that supported password protected blogs in a nice way. So I whipped up this little client. I’ve since found that some of the newer versions of the clients seem to support password protected blogs 😉

Ah well, it was a fun exercise making a blog client using Cocoa and the WordPress XML-RPC interface. I’ve had a couple of interesting problems with pictures displaying differently under Tiger to the way they look under Panther, but I think I’ve figured that out now 🙂 It seems that NSTextView respects the DPI settings in an image under Tiger while under Panther it does not. I had to hack about a bit in NSTextView, NSTextAttachment and NSTextStorage to find a solution.